I still keep a heavy snap-on lid on the bench next to the lightweighted one. Same outer diameter. Same polypropylene. Flex the centre panel and you feel where the resin went.
Getting that lighter lid onto a live filler was line engineering. I took mass out of the wall, put it back into a rib field that could still stack and seal, and I held the cavity steel until the filling line confirmed the part still behaved at speed.
What's Inside
- How snap-on lids became over-walled — and what actually moved the mass
- When a lighter lid met a filler that would not slow down
- Resin taken from the wall and put back into the rib field
- Fill, freeze and warp checked before any cavity steel moved
- What stacking, sealing and denesting did on the live filling line
- Put the next lighter lid on the filler before you freeze the cavity
How snap-on lids became over-walled, and what actually moved the mass
I inherited a lot of lids that were thick because that was the cheap way to sleep at night. Resin used to be the easy variable. Drop tests ran with historical safety factors exceeding 2.5x. Stack crush was bought with millimetres of polypropylene in the centre panel. Tool steel was easier to leave heavy than to recut, so the wall stayed fat and the drawing stayed quiet.
That arithmetic flipped when resin prices climbed. Brand teams arrived with lightweighting briefs in the same season. Packaging-waste pressure made wall thickness a line problem, and the EU rules on packaging and packaging waste put the same mass conversation onto commercial calendars.
I will give you the verdict first. Mass left the wall and came back as a redesigned rib field. Mould-flow review and live filling-line trials were the gates that protected stacking, sealing and denesting. Outer dimensions stayed. The non-critical interior was hollowed. Resin price versus tooling-modification downtime set which cuts were worth the steel time.
Once wall thickness sat on the line-engineering list, I stopped treating mass as a drawing note and started treating it as a filler constraint. The rest of this piece is the order I actually ran.
When a lighter lid met a filler that would not slow down
Operations would not slow the line. Sustainability and cost wanted resin out of a high-volume snap-on lid. The filler crew would not accept slower denesting, cocked lids or seal failures. That collision is what forced the geometry work.
I treated the lid as active line equipment. Magazine denest, conveyor stack and closing-head seal all had to hold at incumbent speed. Timing stayed locked on the machine. Polymer geometry had to absorb the mass cut.
The machine was a continuous-motion rotary filler running at 400 to 450 parts per minute. The vacuum denest engagement window sat at 45 to 60 milliseconds. Miss that window and you double-pull or you present a tilted lid to the closing head. Those two numbers are why I would not let a “lighter part” wander into a slower cycle.
Lid As Equipment
Lock the filler’s timing first. Then force every gram you remove to survive magazine denest, closing-head snap and pallet stack at that same speed.
Scope stayed tight on purpose. One lid family. One polymer. One filling format. The mass-redistribution strategy here stays with single-cavity or low-cavitation polypropylene homopolymer tooling; take the same radial rib logic onto a 64-cavity stack mould and melt-shear imbalances wreck the flow assumptions we used.
Resin taken from the wall and put back into the rib field
I modelled a uniform global wall reduction first, chasing the mass target in one pass. Simulation showed the rim hoop deflecting outward under top-load, and the seal went with it. That uniform cut was discarded.
Why the rim stayed at incumbent thickness
Seal land, rim hoop stiffness and stack crush all fail while the centre panel still looks perfectly serviceable. I held the incumbent rim thickness and took mass from the centre panel only. Stack crush still had to hit 18 to 22 kilograms. The hoop had to stay round under that load or the closing head would see a lid that no longer matched the tub.
Ribs that carry stack, lugs that stay proud
Radial ribs went back in to carry stack load. Heights stayed between 0.8mm and 1.2mm so cooling time would not balloon. Ribs that carry stack run radially across the panel. I terminated them short of the seal land so the land could flex on its own. Denest lugs stayed proud. Thin those lugs with the wall and you give away the vacuum window you already locked at 45 to 60 milliseconds.
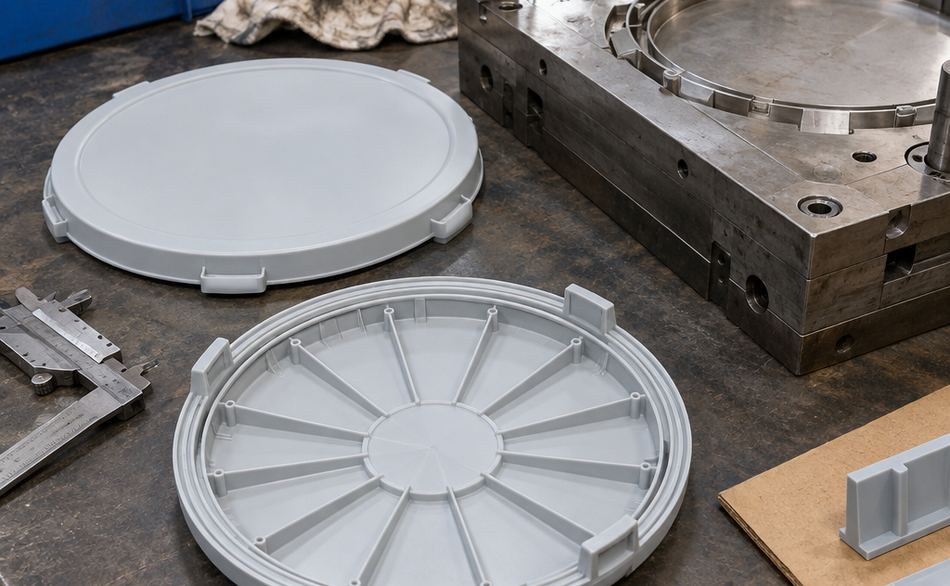
Knit lines, ejection and sink still decide whether a round lid sits in the closing head. A rib that looks stiff on CAD can still pull the panel out of flat as it freezes. I started reading the rib field as a cooling map. Ejector placement followed the same map, because a proud lug that marks on ejection will also hang in the magazine.
Fill, freeze and warp checked before any cavity steel moved
Mould-flow was a decision gate. Thinner walls hesitate. They freeze off. The far-side seal land comes in short, and you only discover that after the toolmaker has already burned hours into a cavity that cannot fill.
What the review had to show on this lid
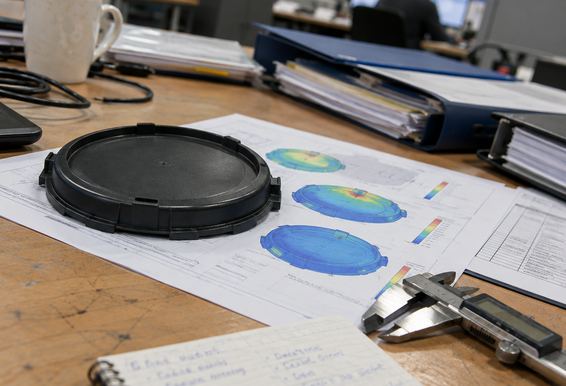
Fill had to reach the rim. Weld lines had to sit clear of denest lugs and the seal. Warp still had to leave the lid flat on the tub. Weld lines sat clear of the denest lugs — the mould-flow review confirmed as much. ISO 9001 process records for this lid family, written against the ISO 9000 quality-system frame we already run on the tool, captured that fill pattern before anyone touched a tool path.
Melt Window First
Lock melt and fill time on the virtual cavity. Then change steel. A recut that cannot fill is downtime you buy twice.
Process window, then steel
I locked the process window first. Melt temperature sat between 220°C and 235°C. Fill time targets sat between 0.45 and 0.65 seconds. Pack followed that pair. Only then did cavity dimensions move in the model, and only far enough to park weld lines away from denest and seal. The toolmaker received a cavity that could fill. That order is the whole point of running mould-flow as a gate rather than as a slide in a review pack.
Skip the window and you ask steel to fix a freeze-off. The far-side land stays short, the snap goes incomplete, and you are back in the press with a heavier pack that undoes the mass you just won.
What stacking, sealing and denesting did on the live filling line
CAD does not denest. I put short-run parts on the filler and watched magazine denest, lid present, close, and pallet stack. That sequence was the only proof I would accept that line performance held.
The trial was built to catch double denest, cocked lids, incomplete snap, and stack lean after dwell. Those are the faults that stop a 400 to 450 parts-per-minute rotary filler, and they are the faults a mass figure on a drawing will never show you.
On the first live run the closing head rocked the lids. I traced it to radial ribs running too far into the seal land. We pulled the rib terminations back by a working margin so the land could flex independently of the rigid centre panel. After that change, the lid sat flat before impact and the snap completed.
Cycle time sat 0.2 to 0.4 seconds off the incumbent. Fault counts had to stay under 3 cocked lids per 10,000 cycles. Those were the gates in the trial log. I logged lid mass against the incumbent on the same sheet. I will leave plant-wide ratios out of this; the log for this lid family is the evidence I trust.
Land Flex Margin
If the closing head rocks the lid, pull radial rib terminations off the seal land before you touch pack pressure or fill time.
Put the next lighter lid on the filler before you freeze the cavity
Work backward from warehouse failure modes and you land on a short-run insert, not on a full production cut. Insert machining sits at 14 to 18 days. Pallet stack dwell runs 48 to 72 hours. Use both before you freeze steel.
Run the insert through this order, at incumbent line speed, and match the incumbent lid on each step:
- Magazine Denest: Verify vacuum engagement within the 45-60ms window without double-pulls.
- Tub Presentation: Confirm lid sits flat prior to the closing head impact.
- Snap & Seal: Check that radial ribs do not interfere with the seal land under the closing head.
- Stack and dwell: Build the pallet as the warehouse will and hold it for 48 to 72 hours, watching for stack lean.
Book the short-run insert this week and run those four checks at incumbent speed before you release the cavity cut.